


Start Playing With Calibre
I worked as a professor of computer science at San Jose State for about twenty years. I often taught software engineering classes in which I’d have my students carry out large programming projects. I liked to break the class into small teams and have each group create a videogame. One of the principles I tried to teach was this: “Don’t worry too much about making mistakes. To learn software engineering, you have to try things out and make a lot of mistakes. The trick is learning how to make mistakes faster.”
When you’re testing out ways to make your document into an attractive EPUB and MOBI ebook, you’ll need to try out a number of options and you’ll make a bunch of mistakes. But you don’t want to keep trashing whatever progress you’ve made. So you need to set up a directory structure that gives you both an archive and an area in which to play.
Suppose your book is called Mybook. So you’ve got a directory called Mybook with, let’s say, your Mybook.doc file in it. Make a subdirectory called DOCS and copy Mybook.doc into there, only change the file name to something like Mybook_april_29_2012.doc, so it’s easy to tell which version it is. Now make a subdirectory called PLAYPEN and save a Rich Text Format Mybook.rtf into PLAYPEN.
And now fire up Calibre. Before going any further you might as well tweak the Calibre Preferences to make the program easier to use. Be default, the Preferences icon is off to the right of the toolbar, you need to click a little double arrow to see it. Open the Preferences go to Interface | Toolbar | Main Toolbar and get rid of most of the toolbar icons. It’s confusing to have so many. You need to keep Add Books, Edit Metadata, Convert Books, View, Help, Save to Disk, and Preferences.
Now, use the Preferences Import/Export | Save to Disk dialog to simplify how your converted ebooks are shared. Turn off all the checkboxes except for “Show files in browser after saving to disk” and change the Save Template’s Template Editor field to just say {title}. So now if you make an EPUB and save it, it’ll show up as a single file in the directory where you pick to save it, and not in some weird subdirectory.

Okay, now let’s retrace some of the steps I described in How to Make Ebooks #2. Simpler Paths—and then go a bit further. Use the Calibre Add Books button to add your Mybook.rtf as a project. Then try setting some Metadata fields for your ebook with the Metadata dialog. And then click on the Convert Options button, select EPUB as the output as described in my earlier section, tweak some of the settings, close the Convert Options, let Calibre whirl a symbol in the lower right of the window until it’s built an EPUB.
Click on the “EPUB” word in the right window of the Calibre screen and Calibre opens a viewer where you can see how your EPUB looks. If you don’t like what you see, try changing some of the settings in the Convert Books dialog and rebuilding the EPUB. Maybe cycle through this a few times.
Controlling Your Format With Sigil
Some things you might not be able to change within Calibre alone. And the Calibre viewer is going to be deceptive about some things—in particular it will make it look as if your EPUB is formatted in a nice serif font (like Georgia or Times), when in fact the EPUB will show up in a less readable (in my opinion) sans-serif font (like Arial) in other ereaders. By default, Calibre doesn’t in fact specify the font style of your book at all, and it will be up the whim of the individual ereading device or program to pick the style. In some ereaders, the user can pick the font, but in some, the author needs to specify the font themselves.
So now let’s find out how to control the font, the spacing between paragraphs, and the size of the paragraph indents.
Use the Save to Disk option to save the MyBook.EPUB into your PLAYPEN directory. Maybe try viewing the EPUB in some other ereaders to see how it looks in them. And then open it up in Sigil to see if you can tweak the format.

As I mentioned before, Calibre will have shattered your text into a number of small XHTML files, typically it makes one such file for each hard page break in your document, which is why it’s a good idea to put these breaks into your original document—so as to tell Calibre where you’d like the breaks. If you don’t have hard page breaks, Calibre may split the document at the Heading 1 formatted lines.
It’s fine if your book is split into a bunch of little XHTML files. The reason for this is, as I also mentioned earlier, so that ereaders can rapidly open successive chapters of the book without having to load the entire document into memory.
Click on one of the text-filled XHTML sections of your book, visible in the Text section of the Book Browser window on the left side of the Sigils screen. A view of the file opens in the center window. Sigil lets you view it in “book view,” in “code view,” or in a “split view” with both.

Take a look at the code in particular. It’s somewhat ungainly HTML that was automatically generated by algorithms within the Calibre program. You’ll see cryptically named styles like calibre4 or s2. The styles appear in CSS-style class statements such as <div class=”s2″> or <p class=”calibre4″> or <span class=”none2″> .
The HTML div and span tags are container tags simply used to apply class styles to whatever is inside them. You use span for just a few words and you can use div to hold several paragraphs. I dislike div and span, I think they’re ugly and confusing and they suck and I try never to use them in my HTML code.
In any case, the p tag is a good, honest tag with a real meaning. It’s used to mark a paragraph. And even if the p is inside a div, the class assigned to the p takes precedence over any class properties assigned to the div. So lets not worry about any crappy div or, for that matter, the span tags.
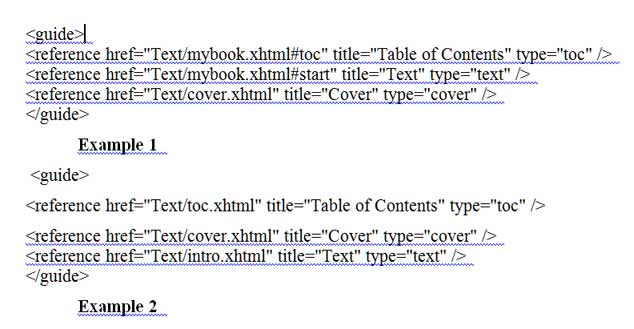
Looking into your book’s XHTML files you’ll probably find that most or all of your text paragraphs have the same class applied to them, that is, each paragraph has a form like:
<p class=”calibre4″>Blah blah …. blah. </p>
Of course it might specifically be calibre4, it might be some other name that Calibre generated. But, just for the sake of discussion, I’ll keep saying calibre4. In this case, the definition of the calibre4 style is a key control-point for you.
That is, if you want to tweak the appearance of your text, you want to look at changing the calibre4 style.
Looking through your XHTML files some more, you’ll also find that the Word Heading 1 styles have become h1 in HTML, all of your chapter titles have a single style class to them, perhaps a class called something like calibre2. So a chapter title looks something like the following (possibly with a superfluous unnecessary span tag robotically nested in there).
<h1 class=”calibre2″> Chapter Seven </h1>
So let’s talk about how we can do some quick tweaks to the these kinds of style class attributes like what we’re calling calibre4 and calibre2 in order to make the text and the chapter titles of your ebook to look the way you want.
Font Family, Paragraph Spacing, and Paragraph Indent
Where do the Calibre-defined styles live?
Look at the Sigil Book Browser window again. Under the Styles heading is a file called stylesheet.css. Double click and it opens in a code window-sheet in the central window. Scroll through it, noticing all the weird random style names. (The names appear with a . in front of them when defined in a CSS stylesheet file, but when they’re used over in the XHTML or HTML file, you don’t have the . in front.)
Find the styles that seem to be attached to your paragraphs and your headers in your XHTML files, the styles that I’ve been calling, just to call them something, calibre4 and calibre2. Now try editing these styles in Sigil, and flip over to the pane showing the appearance of your text as the CSS styles change.
Keep in mind here, that Sigil is very responsive software, and whenever you change one component of your EPUB file, the changes immediately percolate out into all the other parts. The style changes are visible right away. And, on a different front, if you change one of XHTML file names, this name change is taken into account in the manifest OPF file and in the TOC table of contents file.
Okay, I’m getting tired of working this post so I’ll be brief here.
Some of the main style things you want to get control of in your text and headers are the following.
*The font family for text and for headers. Go with a serif font. You list fonts in so-called font stacks, and the reader picks the first if it can, then the second, then the third and so on. “serif” just means any old serif font.
font-family: Georgia, Times, serif;
*The font size for headers. The size is measured in “em” which means the default size of a letter m.
font-size: 1.5em;
*The skipped-line or no-skipped-line between paragraphs of text. For no skipped line use the following two lines saying not to skip space before or after your paragraph. If you want space, put in some number as an em value, like 0.5em or 0.75em, meaning to skip that big a percentage of the size of a letter.
margin-bottom: 0;
margin-top: 0;
*The size of the indent in the first line of a text paragraph. Put zero indents for a header style. The following is a good indent for text paragraphs. Again we measure in “em”.
text-indent: 1.75em;
*The alignment of your text or header (left or centered or justified). For headers you want left or centered, for text, justified is better, as it looks more natural in ereaders, and people expect it.
text-align: justify;
So fool with these in Sigil, flipping between your style.css pane and a pane showing your text, until you see what you like. Then Verify your epub file one more time and save it and it’s done. As an example, you can look at my file rudyebookstyles.css of the style definitions I like to use.
On to How To Make an Ebook #4: Heavy HTML. My fourth 2012 post on these topics. How to roll your own HTML file without Calibre, and how to get better control over images you want to include.