


[Note: I slightly revised this post in December, 2016.]
In my previous post, How to Make Ebooks #1: Getting Started, I talked about five levels of workflow for making your own ebooks, (1) Simplest Upload a DOC, (2) Simple Convert a DOC, (3) Medium HTML, (4) Advanced HTM, and (5) Pro InDesign. Today I’ll talk about the (1) Simplest Upload a DOC and (2) Simple Convert a DOC levels. Much of this material carries over to the other levels as well.
This is a lot of material for a blog post. Oh well. I’ll break it up with some photos. When I’m done with these posts, I’ll combine them into a single file with no illos, and make them into an ebook pamphlet How To Make An Ebook.

Cleaning Your Text File
I happen to use Microsoft Word, but these remarks should apply to other word processors as well. Before you start epublishing your book, you want to get it into a reasonable format. To start with, I do a series of Search and Replace All calls.
*Replace double spaces by single spaces—do this several times to squeeze out the triple and quadruple space.
*Make sure your word processor is set to use smart or curly quotes—if not, set it that way, then replace all quote marks by quote marks (they’ll become curly), and do the same for apostrophes.
*Replace all triple hyphens — by the em dash symbol. Then replace any double hyphens — by the em dash as well. In the same vein, replace any triple periods by the ellipsis symbol.
* Get rid of any tabs. In Word this means replacing ^t by nothing. Epub and Mobi won’t show tabs. If you want paragraph indents, change the paragraph format style to do this. An indent of 0.3 inches looks good in epub format—you tend to want a little less of an indent in an epub than you’d want in a normal text printout.
*While you’re at it, get rid of all skipped lines between paragraphs. In Word, this means replacing ^p^p with ^p. If you want skipped lines after paragraphs, the HTML can do that automatically at a later point. If you want to use skipped lines for section breaks, it’s probably better to replace them by a typographic symbol like “***”.
*Use a web-page friendly font. Remember that an Epub or a Mobi is bascially a compact website. I prefer serif fonts as opposed to start sans-serif fonts like Arial. Georgia is a good serif font that you will work for most ereaders.
*What about paragraph alignment: Left or Justified? You’re probably used to working with Left, as otherwise the text jumps around weirdly while you write. But generally Justified looks better on ereaders—it makes it easier to see the paragraph indents. It’s a design decision, and you can try it out both ways.
*You can try putting in page breaks after your title page, after your table of contents, and after each chapter. These may or may not stick to the format when you convert to Epub.
Keep in mind, by the way that you’ll probably want to to multiple builds of your Epub and Mobi, trying out different looks. So the design decisions you make at the start aren’t necessarily irreversible.

Internal Table of Contents.
You might as well autogenerate a TOC or table of contents in your word processor before loading your document to an Epub. The first, crucial step is to make sure that your chapter headings are formatted in what Word calls the Heading 1 style as opposed to a paragraph style. That way when your document is munged into an HTML on the way to becoming an Epub and Mobi, your chapter headers will get a native HTML style called h1.
Word and other processors let you insert an auto-generated TOC into your doc, based on the Heading styles. Typically, you only want the Heading 1 entries in the TOC, so it’s not too cluttered. Or if you have Heading 2 entries, you don’t want more than one or two per chapter.
Anyway, put a simple autogenerated TOC into the start of the word processor doc. And then—crucial step for later use, go to the line before the start of the Table of Contents and ask your word processor to add a so-called Bookmark (or Anchor) with the name “toc.” And then the Kindle reader can use that to find your TOC.
One more thing, the very first page of your document should be a title page, rather than the cover, and the title itself should be given the Heading 1 format. It seems dumb to have the book title in the Table of Contents, but that’s what iBooks wants.
Later we’ll learn that you don’t totally need the internal table of contents, as the Epub format generates its own TOC, and the Mobi can too, but it doesn’t hurt to throw the reader a frikkin’ bone in terms of finding their way around your book.
Cover
For the cover of your Ebook, use an external photo editor to create a cover.jpg file which is about 600 pixels by 800 pixels high. The cover obviously should show your name and the title of the book. Save it in your images mages subdirectory. In World use Insert | Picture to insert this image near the very start of your DOC. Format the paragraph holding the cover image as Left or Centered, rather than Justified.
If you have more images, you can insert them too, although we’ll have more to say about this.
As I mentioned before, the cover should be near the start, but the very first page of your document should be a title page.
If you want you can save a bigger version of your cover as well. When you upload to Amazon or B&N, they’ll as for a cover image, and you can upload the same one you use in the book or you can upload the bigger one.
Simplest of All: Upload a Doc. And Preview It.
Upload your DOC or RTF to Amazon KDP and, if you like, to NOOK. You’ll need to upload a cover image JPG file as well. And Amazon KDP will let you download the MOBI file and NOOK will let you download the EPUB. And then you can look at them.
And remember you can view the Mobi in the Kindle Previewer, which can be set to match various types of Kindles. One thing to remember about the Kindle Previewer is that its images look a little screwed-up on Windows if you’ve set your Display to make the screen text larger than the default 100%. You can temporarily rest your screen text to 100%, or you can download a Kindle app and view the Mobi in that instead.
For EPUB, here are some options:
*Multiplatform Desktop: Firefox EpubReader Add-on .
* Android: The FBReader and Aldiko apps are recommended.
* iPhone/iPad/Mac: The free iBooks app is one of very best ebook readers around.
You’ll probably notice that your Epub looks different in the different ereaders and the Mobi looks different in different kinds of Kindles. Kindle tends to put a large paragraph indent, doesn’t skip a line between paragraphs. Kindle Fire does no indent, skips a line between paragraphs. iPhone does a small indent if you asked for that, doesn’t skip a line. NOOK doesn’t resize images below a certain size. Etc.
There’s not a huge amount you can do about this, although I will talk about formatting in section #3 of these posts. Creating Ebooks is one of those “write once, debug everywhere” software things. Rather than going crazy over this, you need to accept a certain lack of control.

Make An EPUB and a MOBI with Calibre
Suppose you want to get a little further in. Let’s move from the simplest level to the simple level. Try building EPUB and MOBI on your own machine.
Save your document file into the RTF format. Then open Calibre, and use the Add Books button to add your RTF file. Click on the Convert Books button, set the output format in the upper right to EPUB, and fill in some of the info in the Convert Books dialog.
One thing you want to do is fill in some of the Metadata fields. If you have a cover graphic for your book you can add it now, it might as well be color. It can be 600 by 800 pixels, although certain sizes fit better with certain readers.
Looking down along the left margin of the Convert Books dialog you’ll see other subdialogs to play with. Look and Feel gives you some leeway, but not all that much—to really change your appearance you’ll need to take the Medium level workflow and play with some HTML. For now, you might as well leave Look and Feel at its default values.
The Page Setup subdialog is kind of important. The main thing it affects is whether or not Calibre is going to resize any images in your document. If you set Kindle for the output, it’ll crush the images down to about 500 pixels across. I like to change the Output profile to Tablet, which allows images to be up to 1000 pixels across without being resized. Default Input Profile is fine.
We’ll talk about the Table of Contents options below.
So now click the OK button at the bottom of the Convert Books dialog and whirl-whirl-whirl, a little graphic wheel turns at the lower right of the Calibre window and your RTF is converted to an Epub.
Now you can go back to Convert Books and set the Output to MOBI and make a MOBI too. Another way to get from EPUB to MOBI is to open the EPUB in the Kindle Previewer, it does a version as well.
You can preview your Epub and your Mobi by clicking on the file format name beneath the image of your book in the right side of the Calibre window. Note that the Calibre previewer doesn’t preserve the proportions of images like your cover, it distorts them as you change the viewer size—don’t worry about this, you won’t see this bad effect in other ereaders
And you can use the other previewers I mentioned above.
Examine and Verify the Epub with Sigil
Now try opening your Epub with the Sigil tool. Here we’re just opening but note that Sigil can open an HTML and convert it to Epub on the spot. But now just open your new Epub.
Use the Sigil menu item View to put check marks on Book Browser and Table of Contents so you see those windows.
The Book Browser shows all the different components that are hidden inside your EPUB file. Two special weird files are CONTENT.OPF and TOC.NCX. You can click on them to see what’s inside them…computer-code type text.
The other files are under headerings like Text, Images, and Styles. You will probably see quite a few HTML files in the Text section, or more properly they’ll be XHTML (almost the same as HTML). Not just one of them. Where did so many of them come from?
Well, the average ereader has limited computational resources, and it doesn’t like to bite off the whole big book at once. So Calibre, or any online “meatgrinder” conversion program such as the one used by Kindle — when converting your RTF to EPUB, they’ll break your document into a buttload of small XHTML files. That’s why you see so many of these files. By the way you can split up HTML files inside Sigil by hand, and we’ll discuss that later.
Also note that you’re free to rename some of the XHTML files if you want, and the changes will instant percolate out into the other parts of the EPUB build. Sigil is a smart and responsive program, and it constantly updates the whole EPUB to match any changes you make in any part.
The Sigil Table of Contents window should show a Table of Contents. If it’s not there, you can automatically create a Table of Contents by clicking Generate TOC from Headings, and then clicking OK in the Heading Selector. You can see if it worked by double clicking on some of the items in the Table of Contents box.
If you didn’t format your book title as a header in Word, you can still do that here in Sigil. Select the title and use the drop-down menu on the upper left corner of the Sigil window and apply a format such as Heading1.
Use the menu item Tools | MetaEditor… to fill in names for the Title, Author, and Language of your EPUB file, if you didn’t do that before.
In the Book Browser window in the left hand side of your Sigil window, find the Images directory and look for contents.jpg in there. Right click on it, select Add Semantics, and check Cover Image…this helps the readers know where your cover is.
Now use the Sigil Tools | Validate EPUB selection to see if you get errors. If you click on the error messages, you’ll see source code for the HTML, showing where the error lies. Often you can get rid of many errors by asking Sigil to rebuild the Tabel of Contents.
For future reference, if you don’t understand a Sigil error message paste it into the Google search box. You can fix them in the HTML files that you see in Sigil, as it allows you to edit the component XHTML files. But I’ll talk about this later.
For now save the Epub. If you made any changes, add the new version to Calibre as a fresh book and generate a Mobi again. Or load the Epub into Kindle Previewer to get a Mobi.

The Mobi TOC Problem
On my first Epub and Mobi builds, the TOC, or Table of Contents, gave me a huge amount of trouble. The weird thing is, your ebook is going to have two tables of contents. One of them will be an ordinary table of contents that’s inside your text.
The other will be a hidden file called TOC.NCX that’s part of the Epub package.
You can see the TOC.NCX if you open your Epub file in Sigil, and you can ask Sigil to generate this TOC.NCX, which is often a good idea, in case the TOC.NCX hasn’t yet been properly filled out.
Regarding the in-text TOC, the easiest way to get one might be to let Calibre make one for you when you covert your Epub to Mobi. To tell Calibre to make a TOC at all, you need to open the Convert Books dialog, set Output to MOBI in the upper right corner, click on the Table of Contents icon on the left. I like to check the “Do not add detected Table of Contents” box, and put these six symbols into the Level 1 TOC (Path Expression) box:
//h:h1
And I leave the Level 2 TOC and Level 3 TOC boxes blank. This tells the Calibre TOC generator only to make listings for the Heading 1 or h1 titles…as opposed to putting in an entry for every dippy little Heading 2 or Heading 3. I could also check the “Force use of auto-generated Table of Contents” box, I suppose, but I tend to leave it unchecked in case I have a hand-made TOC in my file.
Calibre actually puts this TOC into your Mobi file by default at the end. If you want the Calibre generated TOC at the start, you can tweak a setting in the Mobi Output section of the Convert Books dialog.
The other way to get a Mobi TOC is to do it yourself, may god hace mercy on your soul. I did this a few times when I was starting out, but I’ve found ways to avoid doing it—like by letting Calibre make my TOC, or by using InDesign and having it build a TOC on export.
But here, for those who care, is a how-to on hand-made TOC. I mentioned before that you might as well put a simple autogenerated TOC into the start of the word processor doc. And I said you ought to go to the line before the start of the Table of Contents and ask your word processor to add a so-called Bookmark (or Anchor) with the name “toc.” While you’red at it, put a hard pagebreak before and after your internal TOC, which will probably force it into a separate little XHTML document of its own when Calibre shatteres your document into numerous small HTML files.
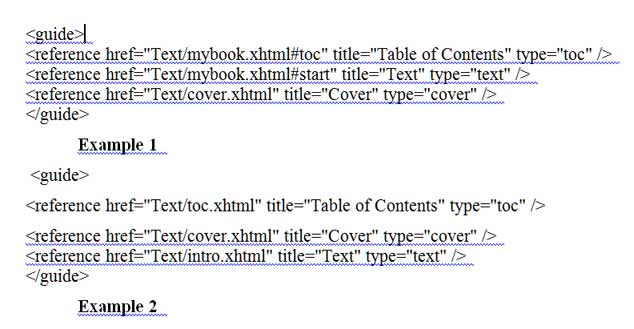
The Kindle reader can use the bookmark or the separate XHTML fragment to find your in-document TOC, but you have to feed it a so-called guide reference that you edit into place using Sigil on the Epub file.
The so-called guide references live near the end of an Epub component file called CONTENT.OPF. You can browse and edit this file if you open your Epub inside Sigil. Just click on CONTENT.OPF. Typically Kindle only pays attention to three entries with these types: “toc” “cover” and “text.” The “toc” link goes to the Table of Contents. The “cover” link goes to your cover image. The “text” link goes to where you want the beginning of the book to be. You title these references “Table of Contents”, “Cover,” and “Text” or “Beginning.”
The links that you give for these references are either bookmarks within pages or they are individual component XHTML “web pages” of the web site encapsulated in the Epub.
Here are two examples.
Example 1 uses bookmarks within pages, where you’ve also added a “start” bookmark for where you want the reader to begin with your book. The cover reference will probably be autogenerated and the file holding the cover renamed cover.xhtml. See the image below of the code in CONTENT.OPF.
Example 2 is for when your files are shattered into little ones and your in-text table of contents ended up in its own page. You might as well rename this page “toc.html” and while you’re at it, rename the page holding the cover “cover.html” and the initial introductory part of your book “intro.html.” Then the guide material looks like the second part of the image from CONTENT.OPF below.
Yeeeeeeccchhhh. Too complicated! That sodding TOC! But the difficulty isn’t not insuperable. Tweak around for a bit, and you’ll have a working Mobi table of contents.
To summarize, there are three different ways to fix the Mobi TOC problem. (1) Use Calibre to convert to Mobi, and tell Calibre to generate a TOC in the Mobi output. (2) Generate an internal TOC in your document, put a bookmark on it, and use Sigil to set the Epub CONTENT.OPF guide to reference to this bookmark. (3) Generate an internal TOC in your document, and use Sigil see that it ends up in its own XHTML fragment that you name toc.xhtml, and set the Epub CONTENT.OPF guide to reference to the toc.xhtml file.
Any of these is easier than it sounds. Don’t be afraid to get in there and tinker.
In the next installment we’ll get into text and image formatting issues.
April 23rd, 2012 at 5:13 pm
Speaking of removing multiple spaces… I had to do this at work recently and if you have an editor or command line tool that supports regular expressions you can replace ” +” with ” “. That space-plus with space which will replace any instance of one or more spaces with one space. Clears everything up at once instead of multiple replaces. I actually replaced ” +” with “” because the person who had formatted the document was using spaces to do word wrap… *facepalm*
April 25th, 2012 at 7:24 am
It’s fun to learn new stuff at our age. I’m looking forward to being able to upload my brain before long.
May 3rd, 2012 at 9:40 pm
In the mid-1990s, I had to use Aldus Pagemaker to sculpt a quarterly newsletter by force from email text contributions. Massive amounts of replacing ^p^p with ^p, or adjusting hundreds of line feeds or fixing extra spaces that were supposed to be carriage returns, etc.
I don’t ever want to go through that again. There must be an emoticon for ^p. What would that look like?
September 29th, 2012 at 2:33 am
I’m wanting to put hyperlinks in my eBook file at the end of each chapter so that readers can jump to the TOC or to the commentary section at the end of the book. I’ve been building my eBook as an HTML file and converting it to MOBI in Calibre.
Initially I used “a” tags for my links & my targets, and none of these worked. I’m now going to try making h1 and h2 chapter heads and subheads and see how the autogenerated TOC works … BUT, I still need to make inline links to the various heads and subheads. HOW do I format these in my HTML file so that they convert?
Muchas gracias.
September 29th, 2012 at 2:35 am
ARGH. My code examples didn’t display as code. Sorry about that. Here’s that last paragraph again with “safe” symbols.
Initially I used (a href=”#nnnn”) for my links and (a name=”nnnn”) for my targets, and none of these worked. I’m now going to try making h1 and h2 chapter heads and subheads and see how the autogenerated TOC works … BUT, I still need to make inline links to the various heads and subheads. HOW do I format these in my HTML file so that they convert?
October 2nd, 2012 at 1:29 pm
Malcolm, I’m sorry, I’m not really set up to be offering Q&A help with ebook making. Even though, yes, I did write a little book about it, and these posts. But I don’t have all that stuff in my head or at my fingertips. I found that Googling these questions often leads to helpful advice, although you often need to work Google for five or ten minutes, trying different search word combos and delving into various hits. Also, one of the best spots to dig around is in the MobileReads forums.
http://www.mobileread.com/forums/
Good luck.
October 9th, 2012 at 11:16 pm
I’m using LyX with hyperref to produce pdf and then calibre to make epub or mobi books. Links work fine.
December 19th, 2012 at 5:42 pm
You have a nice blog. It would be really nice, though, if you could give instructions for us Mac users since nothing seems to work properly in the Mac universe for epublishing. What about us?
Kindlegen for Mac doesn’t work, I’ve tried making a mobi or awz3 file thru Calibre, everything comes out terrible with the Kindle products. Only Kindlepreviewer boots up. How do I edit anything THERE for saving?
Thank you, I’m still gnawing my arm off.